Model #3514
Description
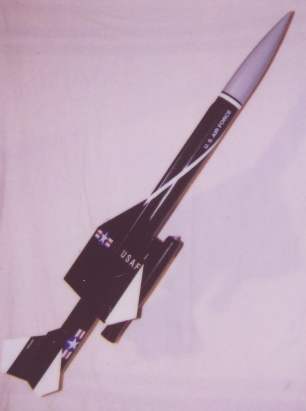
The Bomarc lifts off with the excitement of powerful G motors. The Bomarc represents a scale version of the real thing as a concept in a flying model kit. Colorful decals, plastic molded detailing and precision laser cut plywood parts make building a snap with impressive results.
Additional Information
- Length: 53.3″
- Diameter: 3″
- Weight: 32oz
- Recovery: 24″ Parachute
- Parts List
- Nose Cone NC-30P1- 72803
- Airframe Tube BT-3-34 – 31757
- Shock Cord SC-1/2-72 – 87255
- Parachute (2) PARA-24 – 32814
- Motor Tube MT-11-17 – 30137
- Centering Rings CR-3-11 (3) – 37936 A, B, C
- Motor Retainer MR-1 – 37936D
- Launch Lugs LL-11/4-1 (2) – 38179
- Gorilla Shock Cord Mount KitGOR-21 – 87254
- Loop/Sleeve Connector (2) – 38394
- Steel Cable – 38395
- Balsa Sheet Stock (9) – 32109
- Vacuum Form Sheet 1 – 32840
- Vacuum Form Sheet 2 – 32841
- Vacuum Form Sheet 3 – 32842
- Vacuum Form Sheet 4 – 32843
- Vacuum Form Sheet 5 – 32844
- Vacuum Form Sheet 6 – 32845
- Vacuum Form Sheet 7 – 32838
- Vacuum Form Sheet 8 – 32839
- Airframe Tube BT-3-7 – 31462
- Tube Coupler TC-3 – 30187
- Nose Weight Clay (2) – 87257
- Wood Dowel 1/8″x5″ – 51827
- Balsa Wood Sheet 1/4″x3″x18″ – 51450
- Decal Sheet Stars & Bars (2) – 37709
- Decal Sheet Bomarc white – 37714
- Pattern Sheet Bomarc – 83368
- Recommendd Motors
- F62-4, G70-5
Instructions
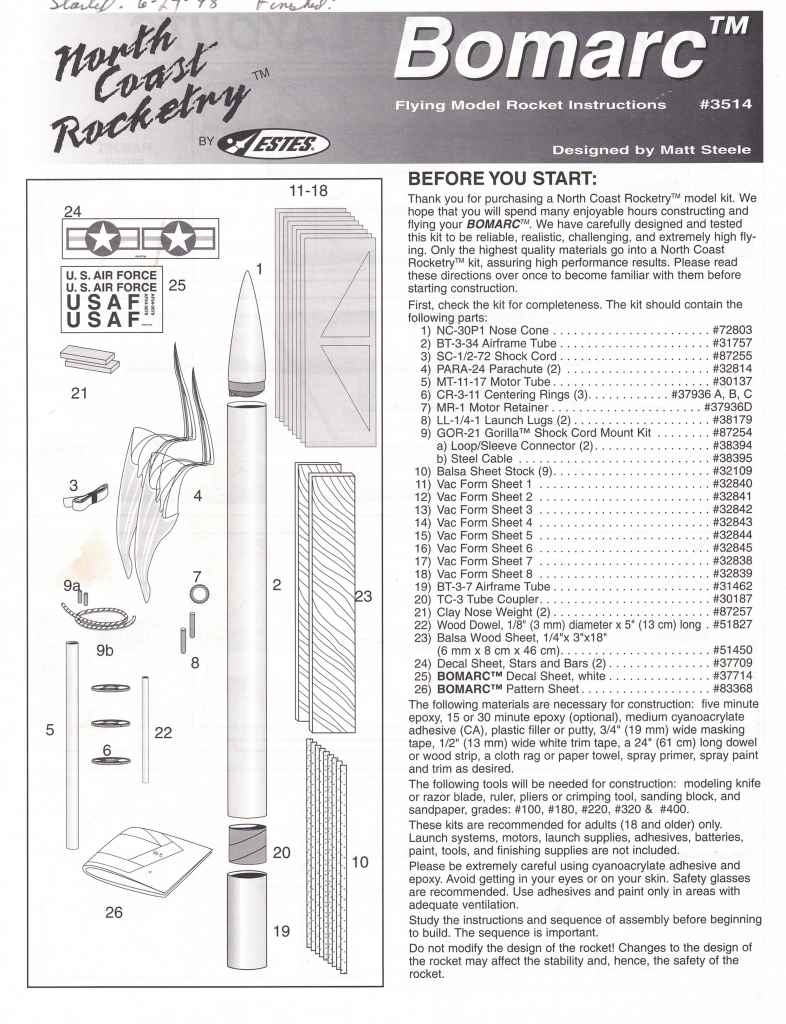
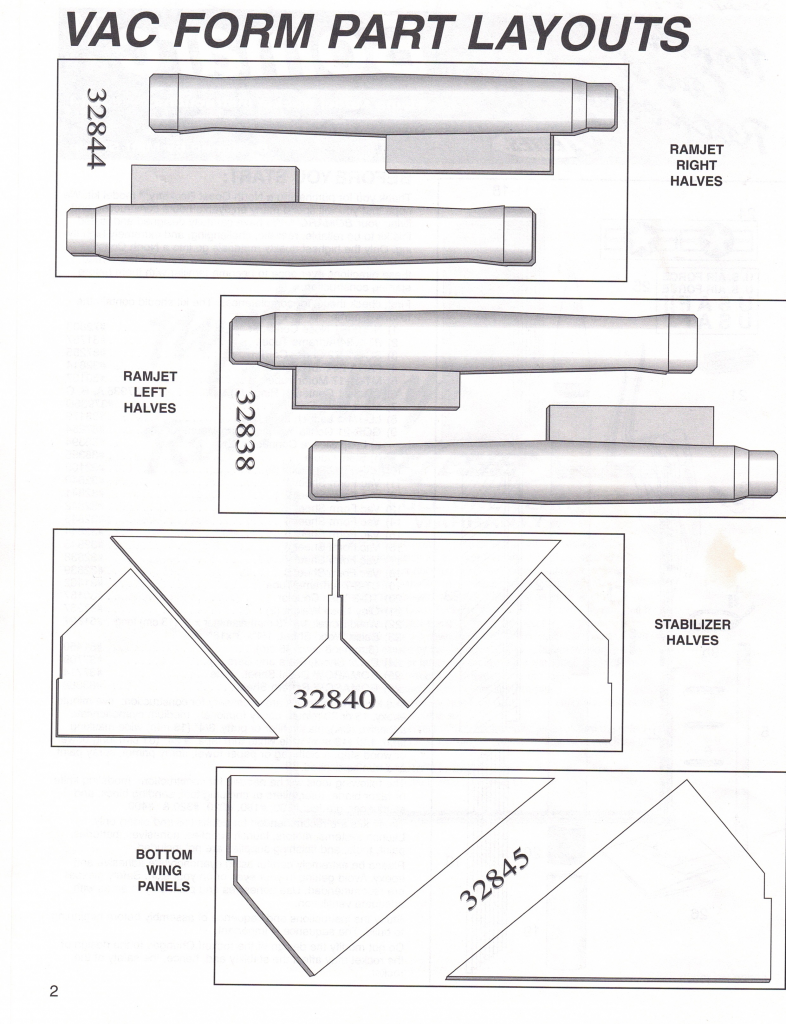
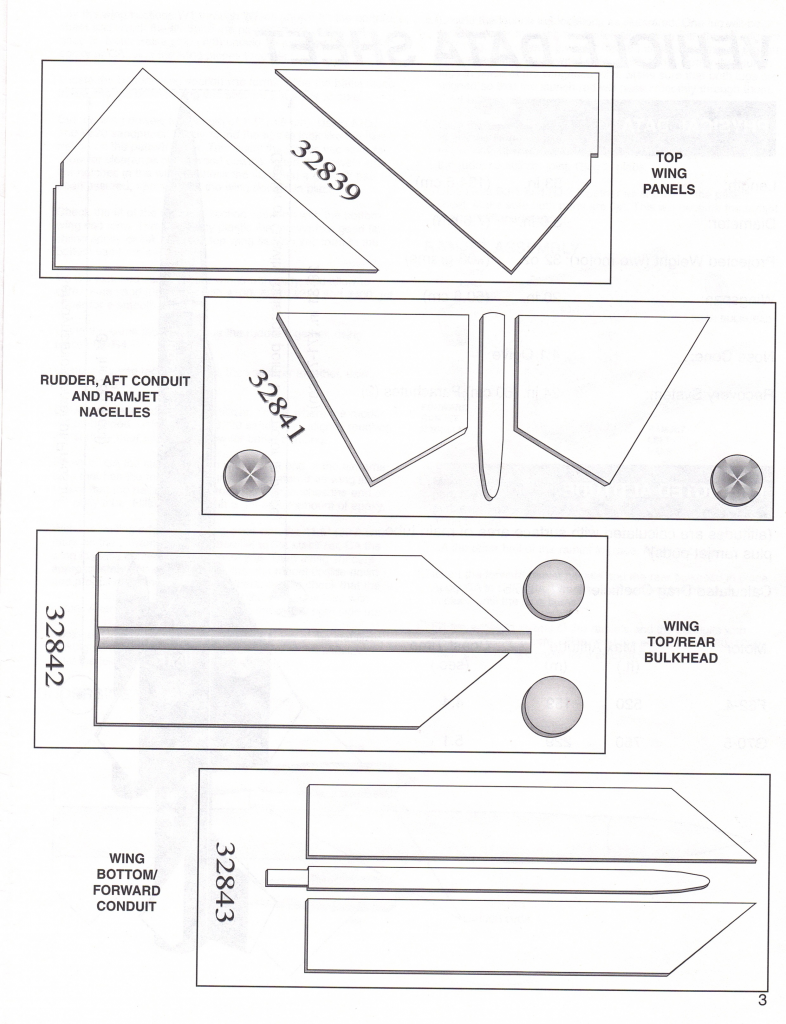
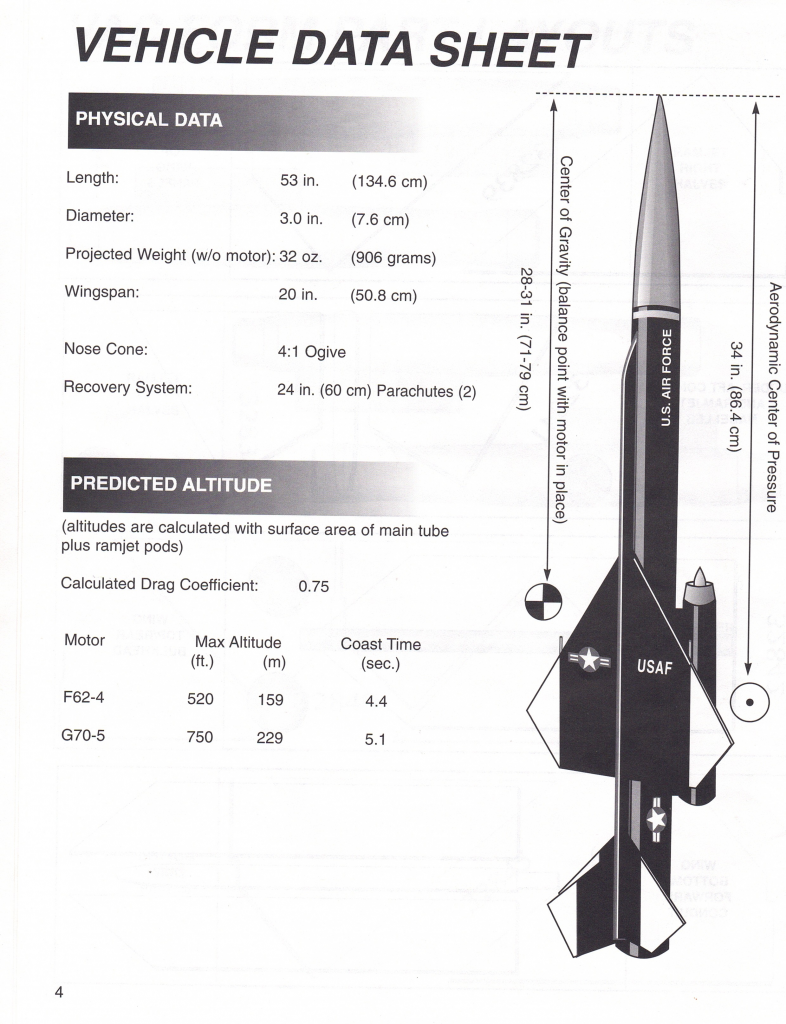
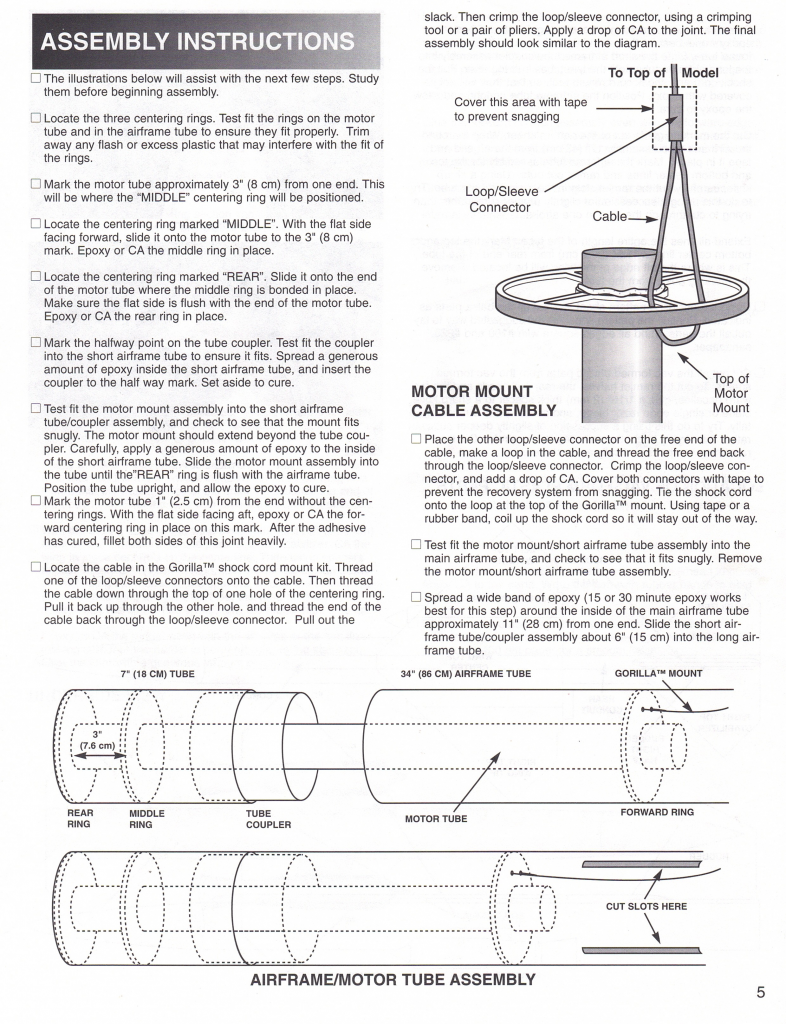
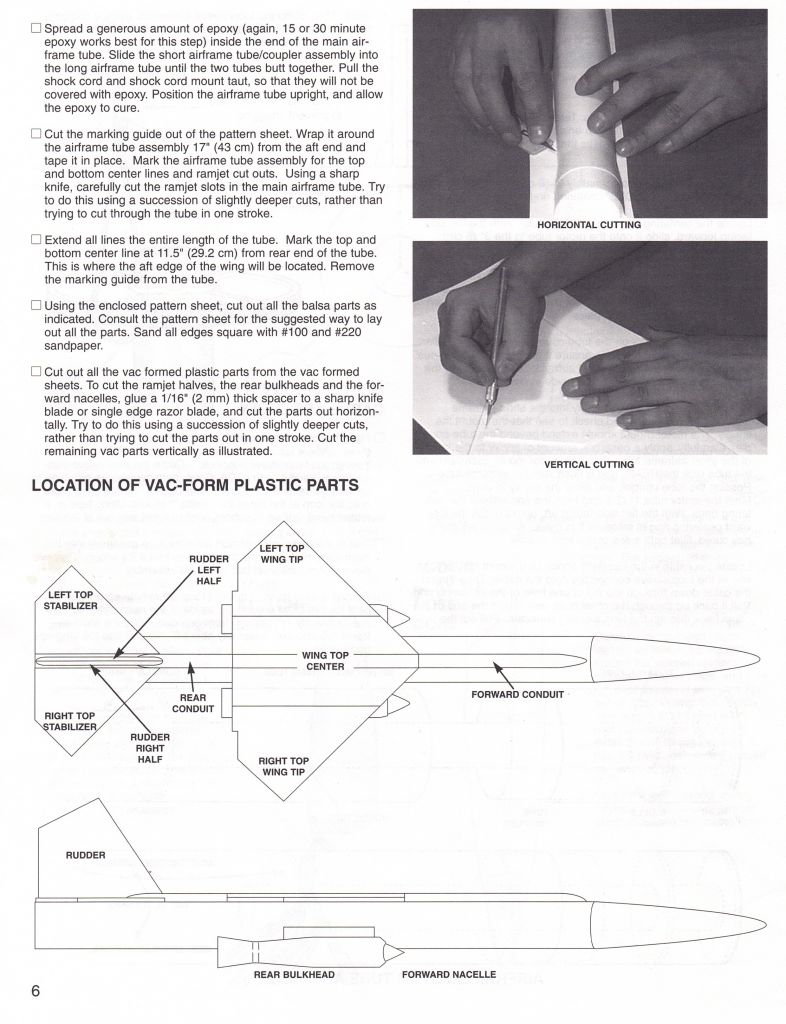
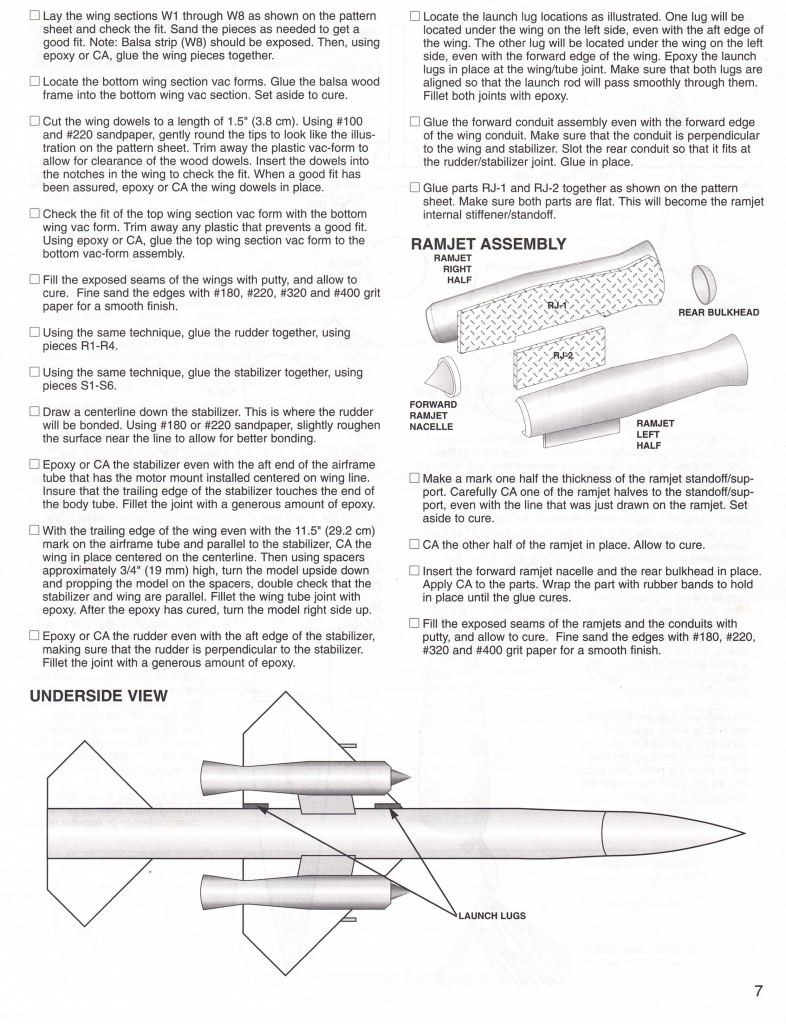
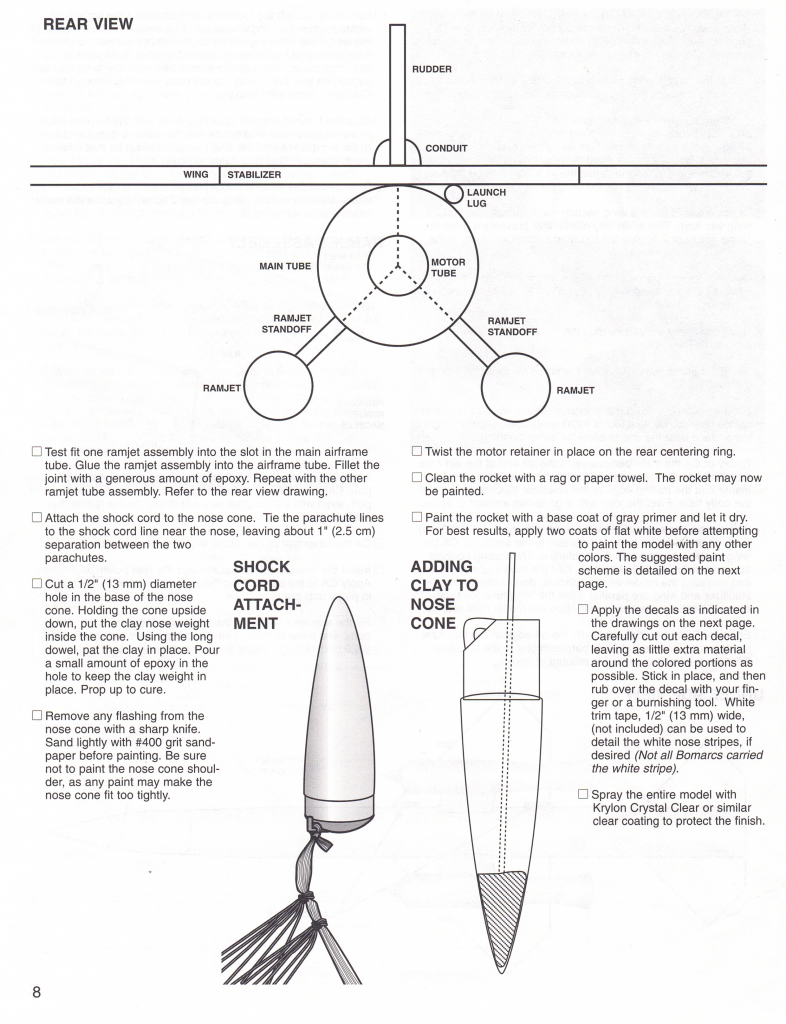
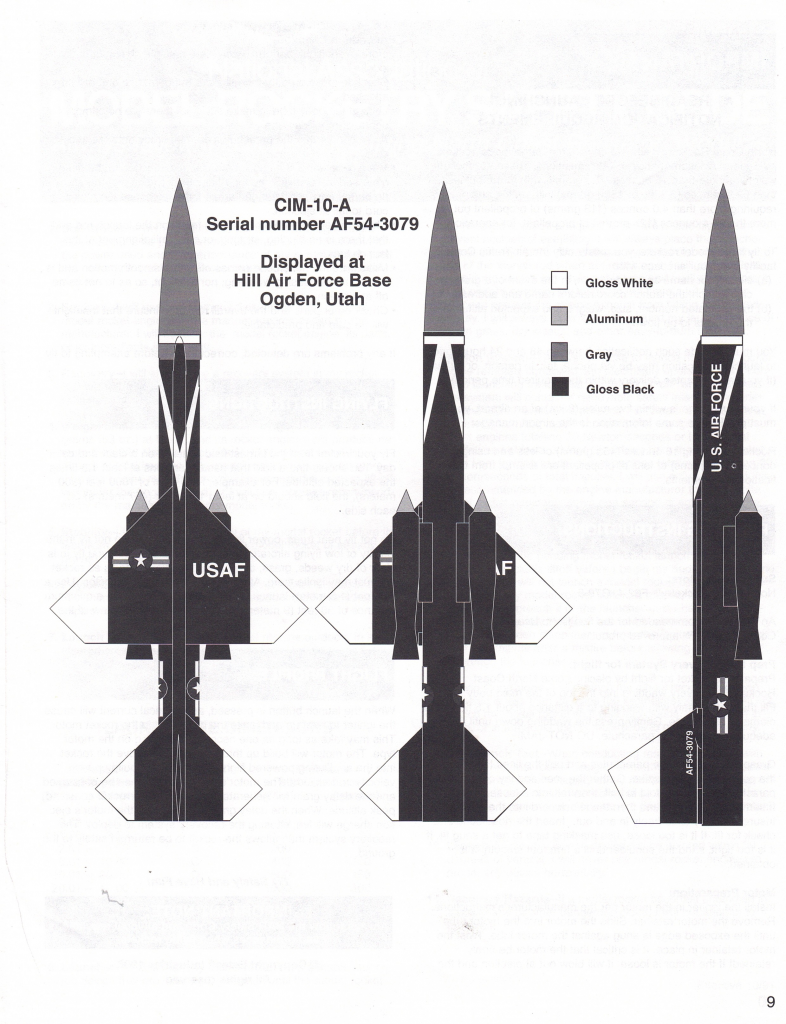
Photo Gallery
Build History
- 06/24/1998 – Jeromie purchased NCR Bomarc from Hobby Lobby in Monroe, LA for $74.88 as a father’s Day present.
- 06/24/1998 – Epoxied the center and end centering rings to motor mount tube. Epoxied tube coupler to small body tube
- 06/25/1998 – .Removed center centering ring from motor mount tube because it was epoxied at 1″ instead of 3″. Re-measured and re-epoxied onto tube.
- 06/26/1989 – Epoxied forward centering with 5 minute epoxy. Filleted top and middle centering rings with 30 minute epoxy.
- 06/27/1998 – Filleted other side of forward centering. Screwed up again. Removed forward centering ring so it would fit over the smaller tube coupler.
- 06/28/1998 – re-epoxied forward centering ring to motor mount tube and filleted with 30 minute epoxy.
- 06/29/1998 – Filleted top forward centering ring joint. Epoxied tube coupler to larger body tube.
- 07/06/1998 – Attached Gorilla leader to screw eye and fastened it to hole in centering ring.
- 07/07/1998 – Epoxied recovery line and eye screw into forward centering ring.
- 10/07/1998 – Filled space where body tubes meet with red Testors putty.
- 10/08/1998 Sanded putty smooth.
- 10/15/1998 – Made a second copy of body tube marking guide and cut it out.
- 10/18/1998 – Cut out ram jet slots from airframe tube assembly.
- 10/28/1998 – Had a copy of wing, rudder and stabilizer drawing made at Kinkos.
- 10/29/1998 – Cut parts for wing, ridder and stabilizer fron 1″ balsa stock. Cut wing 2 parts out and glued them together with Elmers wood glue.
- 10/30/1998 – for $1.90 bought a 1/8″ x 3″ x 36″ piece of balsa stock from Michaels. Cut W1 & W2 and then cut slots.
- 11/02/1998 – Epoxied wing together using 1/8″ wooden balsa cut as per pattern.
- 11/03/1998 – Epoxied rudder & stabilizer balsa strips as per pattern with 2-ton epoxy.
- 11/04/1998 – Cut ram jet parts from 1/4″ balsa.
- 11/09/1998 – Cut all vacuum formed parts from stock.
- 11/10/1998 – Fit plastic skins for rudderand stabilizer.
- 11/13/1998 – Fit plastic parts for wing.
- 11/14/1998 – Completed trim fit for wing plastic parts.
- 11/16/1998 – Epoxied skins for rudder and stabilizer.
- 11/18/1998 – Cut out ram jet halves.
- 11/19/1998 – Glued Ram jet Balsa together with yellow glue.
- 11/22/1998 – Filled cracks and crevices with red Testors body putty. Three apps were applied on wing, rudder & stabilizer.
- 11/23/1998 – Added additional putty and sanded. Cut ram jet tubes. Cut ram jet tubes, and sanded ends. Test fit wooden parts.
- 11/24/1998 – Epoxied balsa and ram jet halves together with 2-ton epoxy.
- 11/29/1998 – Sanded putty and applied additional putty.
- 11/30/1998 – Sanded putty smooth.
- 04/24/2002 – Applied red putty to Ramjets.
- 04/25/2002 – Sanded putty.
- 04/27/2002 – Epoxied wooden dowel rods to wing.
- 04/28/2002 – Filled gaps in wing.
- 04/30/2002 – Epoxied rudder to stabilizer.
- 05/01/2002 – Sanded red putty areas and applied additional putty.
- 05/04/2002 – Sanded putty and applied more putty.
- 05/05/2002 – Sanded red putty areas again.
- 05/06/2002 – Epoxied wing to body tube.
- 05/07/2002 – Cut rear conduit to fit wing, stzbilizer and rudder.
- 07/17/2002 – Epoxied conduit to body tube with 2-ton epoxy and used masking tape to hold in place.
- 07/18/2002 – Epoxied left Ramjet to body tube. Epoxied right Ramjet to body tube. Filled nose cone with clay.
- 08/14/2002 – Sanded forward body filler to conform with conduit.
- 08/19/2002 – Sanded rear body filler to match conduit.
- 09/14/2002 – Filleted tail wing and conduit joints with epoxy. Epoxied launch lugs to wing/body tube joint and filleted the joints.
- 09/15/2002 – Filleted tail, wing and conduit joints with epoxy.
- 08/26/2006 – Spray painted model with Krylon White Primer.
Flights
| Date | Location | # | Motor | Comments |